What tools do I need to install a patch panel?
2026-03-09
Content
- 1 The Tools You Need to Install a Patch Panel: A Direct Answer
- 2 The Punch-Down Tool: The Most Critical Instrument on the Job
- 3 Cable Stripper and Wire Preparation Tools
- 4 Screwdrivers and Rack Mounting Hardware
- 5 Cable Tester and Certification Equipment
- 6 Tone Generator and Probe (Toner and Wand)
- 7 Label Maker and Documentation Tools
- 8 Cable Management Tools and Accessories
- 9 Fish Tape, Cable Pulling Tools, and Access Equipment
- 10 Complete Tool List by Installation Phase
- 11 Tools Specific to Shielded and Cat6A Patch Panel Installations
- 12 Safety Tools and Personal Protective Equipment
- 13 Starter Kit vs. Professional Kit: What to Budget
The Tools You Need to Install a Patch Panel: A Direct Answer
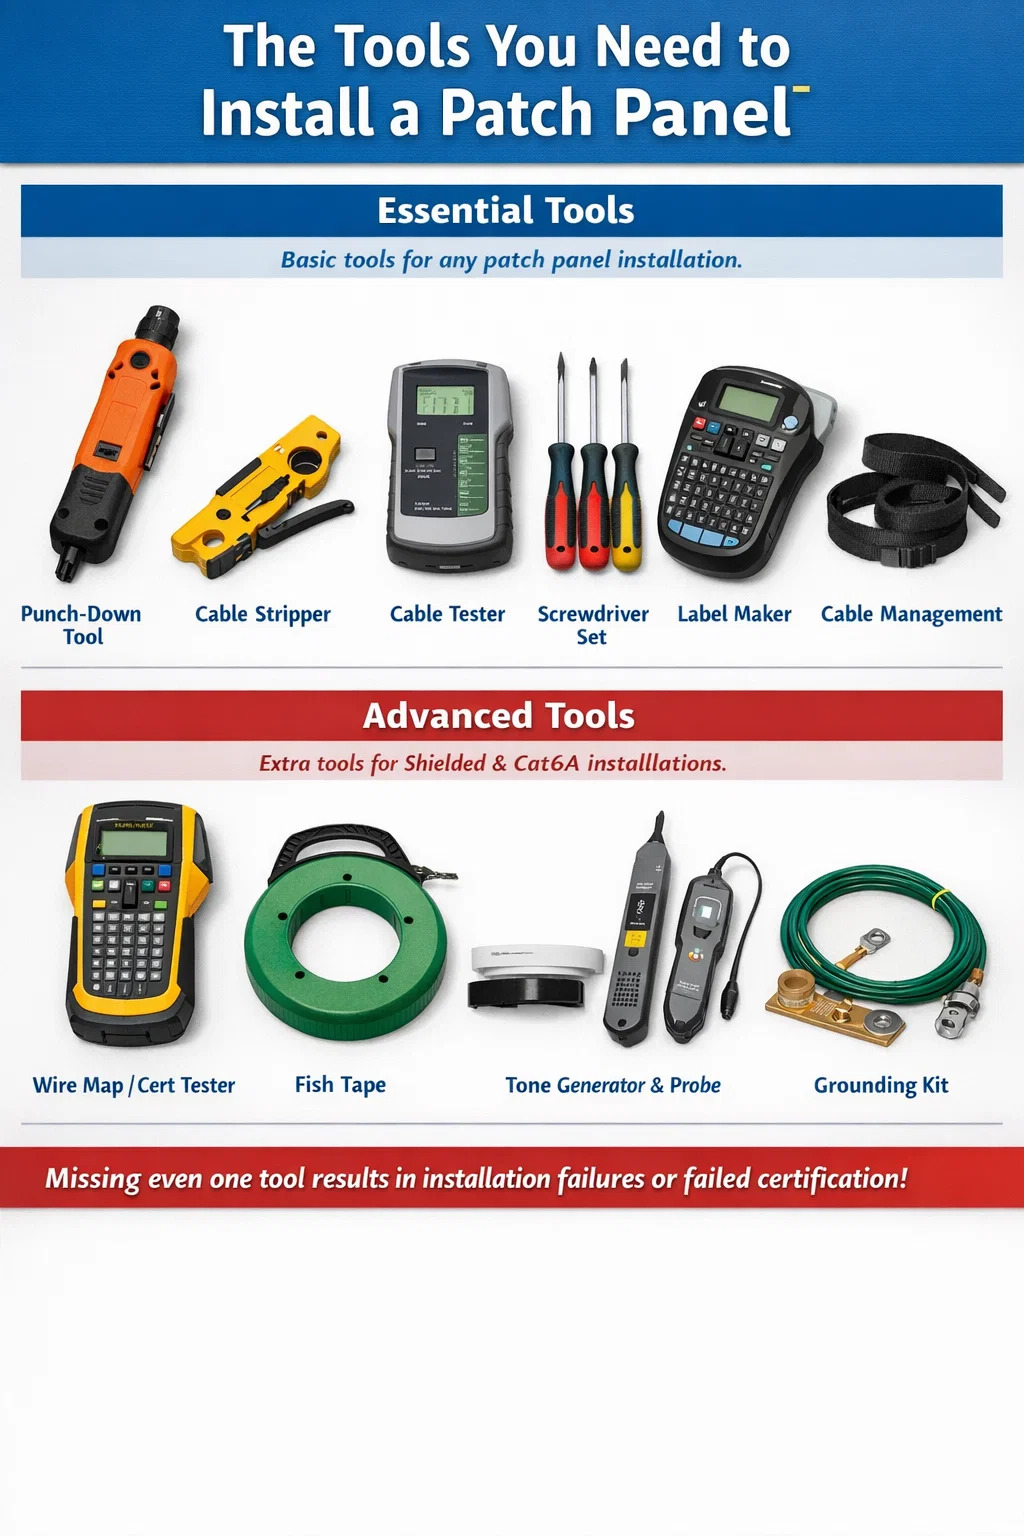
To install a network patch panel, you need a punch-down tool, a cable stripper, a cable tester, a screwdriver set, a label maker, and a cable management solution such as velcro straps or cable ties. For more demanding installations—especially Cat6A or shielded cabling—you will also want a wire map tester or a full certification tester, a fish tape or cable pulling grip, and a tone generator with probe. These are not optional extras. Missing even one of them results in either a failed installation, a non-certified channel, or a maintenance problem that surfaces months later.
The sections below break down each tool in detail, explain why it matters, and provide specific product recommendations and performance benchmarks so you can make informed purchasing decisions before the job starts.
The Punch-Down Tool: The Most Critical Instrument on the Job
The punch-down tool is the single most important piece of equipment for any patch panel installation. It seats individual conductors into the 110-style IDC (insulation displacement connector) blocks on the back of the panel. When the tool strikes down, a blade simultaneously cuts the excess wire and forces the conductor into a tight electrical connection with the IDC terminal. Done correctly, this produces a gas-tight connection rated for the full lifecycle of the cabling system—often 20+ years.
There are two primary punch-down tool types: impact and non-impact. Impact tools use a spring-loaded mechanism that delivers a calibrated strike force. Non-impact (manual) tools require the installer to apply pressure by hand. For professional network patch panel installations, always use an impact punch-down tool. Hand-pressure tools produce inconsistent seating depth, which translates directly to variable insertion loss and near-end crosstalk (NEXT) failures during channel certification.
Choosing the Right Blade
Impact punch-down tools accept interchangeable blades. The two most common are the 110 blade and the Krone blade. Nearly all North American patch panels use 110-style blocks, so a 110 blade is the standard starting point. European and some international installations may use Krone blocks. Confirm the block type printed on the back of your panel before buying blades. Using the wrong blade will physically damage the IDC terminals and destroy the electrical connection.
Most impact tools have a high/low force selector. High force is used for initial terminations on stiff Cat6A conductors. Low force works for lighter-gauge Cat5e wire or for re-seating a conductor that did not fully seat on the first pass. Fluke Networks, Paladin Tools, and Klein Tools all offer reliable impact punch-down tools in the $30–$120 price range, with professional-grade options from Fluke and Ideal Industries running higher.
Ergonomics Matter on Large Jobs
On a job with 200+ terminations, tool ergonomics become a real factor. Cheap punch-down tools with hard plastic handles cause hand fatigue that leads to rushed terminations and missed seating. Tools with rubberized grips and cushioned impact rebound—such as the Fluke Networks D914S or the Klein Tools VDV427-300—significantly reduce repetitive strain. If you are terminating more than 100 ports in a single session, invest in a tool with an ergonomic handle. The $30–$50 premium pays back quickly in accuracy and reduced rework.
Cable Stripper and Wire Preparation Tools
Before any conductor touches a punch-down block, the cable jacket must be removed cleanly. A dedicated cable stripper—not a utility knife, not a pair of scissors—is the correct tool for this step. Cable strippers for twisted pair cabling are designed to score the jacket at a controlled depth so the blade never nicks the conductors or the pair insulation underneath.
Nicked conductors are one of the leading causes of marginal or failed channel tests. A nick reduces the conductor's cross-sectional area, increasing resistance and creating a reflective discontinuity that shows up as a return loss failure on a certification tester. The nick may not be visible to the naked eye, but a Fluke DSX-8000 or similar tester will flag it every time.
Rotary Strippers vs. Blade Strippers
Rotary cable strippers wrap around the cable and score the jacket as you rotate the tool. This produces a clean, uniform score line around the full circumference of the jacket. Blade-style strippers make a single longitudinal cut and require the installer to peel the jacket back. Both work well in experienced hands. Rotary tools from Jonard Tools (model UST-100) and Klein Tools (VDV110-095) are widely used in commercial installations and cost under $25.
For Cat6A cable specifically, the jacket is thicker and stiffer than Cat5e or Cat6. Make sure your stripper's blade depth is adjustable, or purchase a stripper specifically rated for Cat6A. Several manufacturers sell combo strippers that handle both Cat5e/6 and Cat6A with a simple blade-depth adjustment screw.
Scissors and Flush Cutters
A pair of sharp scissors or flush-cut diagonal pliers is needed to trim the spline (the internal separator found in many Cat6 cables) and to clean up conductor ends before insertion. The spline, if not trimmed back flush with the jacket edge, can push individual pairs apart during the termination and cause the pair geometry to shift enough to affect NEXT values. A $10–$15 pair of electronics-grade flush cutters handles this cleanly and precisely.
Screwdrivers and Rack Mounting Hardware
A network patch panel mounts into a 19-inch EIA rack or wall-mount enclosure using standard rack screws. Most racks accept either M6 screws or 10-32 screws depending on the rack manufacturer and model. You need the correct screwdriver—typically a #2 Phillips or a flathead—plus the matching rack nuts and screws.
Cage nuts are the most common rack mounting hardware in 19-inch equipment racks. They snap into square-hole rack rails and accept M6 screws. Installing cage nuts without the correct cage nut insertion tool is painful—the sharp edges of the nut will cut fingers on repeated installations. A dedicated cage nut tool costs $5–$15 and eliminates both the pain and the risk of dropping cage nuts into the rack during installation.
Torque Requirements
Over-tightening rack screws strips cage nuts and warps the patch panel's mounting ears. Under-tightening leaves panels loose, which causes vibration damage over time and creates safety hazards in seismic zones. Most rack hardware specifications call for 0.5–0.8 Nm of torque on M6 rack screws. A basic torque screwdriver with a Phillips bit set ensures consistent torque without guesswork, particularly useful when installing panels in high-vibration environments like industrial facilities or data centers with raised-floor cooling fans running continuously.
Cable Tester and Certification Equipment
Once the network patch panel is terminated and mounted, every port must be tested. The type of tester you need depends on whether you are performing a continuity check or a full channel certification.
Basic Wire Map Testers
A wire map tester checks that all eight conductors in a twisted pair cable are connected correctly from end to end—no opens, no shorts, no reversed pairs, and no split pairs. This catches the most common punch-down errors at a price point accessible to anyone: decent wire map testers from Klein Tools, Fluke Networks, and TREND Networks are available for $30–$150. The Fluke Networks MicroMapper and Klein Tools VDV501-851 are both reliable options for basic verification work.
Wire map testing alone is not sufficient to certify a channel for Cat6, Cat6A, or any rated performance standard. It only confirms physical continuity, not electrical performance. For a professional installation where the end-user expects a warranty or certification report, you need a performance tester.
Certification-Grade Field Testers
Certification testers measure every parameter required by TIA-568.2-D and ISO/IEC 11801: insertion loss, NEXT, FEXT, PSNEXT, return loss, propagation delay, and delay skew. The Fluke Networks DSX-8000 is the industry benchmark, capable of certifying Cat8 channels in under 10 seconds per channel. The IDEAL Industries SignalTEK NT and the TREND Networks LanTEK IV are competitive alternatives at lower price points.
Certification testers are expensive—the Fluke DSX-8000 lists at over $9,000—but rental programs from major vendors and tool rental companies make them accessible for individual projects. For contractors who install network patch panels regularly, owning a certification tester is a direct business investment. A single failed channel that requires rework costs more in labor than a month of tool rental fees.
Fiber Testing Tools
If your patch panel installation includes fiber keystone modules or pre-terminated fiber cassettes, you also need an optical loss test set (OLTS) and ideally an optical time-domain reflectometer (OTDR). An OLTS measures end-to-end insertion loss in dB and confirms the link meets the channel budget. An OTDR identifies the location and magnitude of individual events—connectors, splices, bends—along the fiber run. Entry-level OLTS units from EXFO, AFL, and Fluke Networks start at around $800–$1,500 for single-mode/multimode combo testers.
Tone Generator and Probe (Toner and Wand)
A tone generator and inductive probe—commonly called a toner and wand or fox and hound—is essential for tracing unlabeled cables and identifying which cable run connects to which patch panel port. The tone generator connects to one end of a cable and sends an audible tone signal down the wire. The inductive probe detects the signal without requiring physical contact, allowing you to scan a bundle of cables and identify the correct one by the loudest tone.
This tool is non-negotiable in retrofit or upgrade projects where existing cabling lacks documentation. Even in new installations, having a toner helps quickly confirm that a specific cable run from a wall outlet has landed on the correct patch panel port before termination. Reliable tone generators and probes from Fluke Networks (Pro3000), Klein Tools (VDV500-820), and TREND Networks are available in the $50–$150 range.
Some advanced wire map testers include tone generation capability, reducing the number of separate tools needed on the job. Check the feature list of your tester before purchasing a standalone toner to avoid redundant equipment.
Label Maker and Documentation Tools
Every port on a network patch panel must be labeled at the time of installation. Trying to label retroactively—after the rack is full and patch cords are in place—is significantly harder and produces lower-quality results. A dedicated label maker that produces heat-shrink or laminated labels is a standard tool on any professional cabling job.
Brady and HellermannTyton manufacture label printers specifically designed for network cabling infrastructure. The Brady BMP21-PLUS and the HellermannTyton TAG-IT are both widely used in commercial installations. These printers accept label cartridges compatible with patch panel label strips, cable wrap labels, and port flags. Labels should include the port identifier, the destination outlet, and the cable category. A consistent labeling scheme applied from day one reduces troubleshooting time by hours over the system's lifetime.
Cable Schedule and As-Built Documentation
A label maker produces the physical labels. The accompanying cable schedule—a spreadsheet or database that maps every port identifier to its physical origin, cable category, installation date, and test result—is the documentation that makes the labels useful. Most certification testers can export test results directly to a PC in PDF or CSV format. Integrating those results into a cable schedule creates a complete, auditable record of the installation. This documentation is required for most manufacturer system warranties and is expected by enterprise IT departments as a deliverable on any contracted cabling project.
Cable Management Tools and Accessories
Installing a network patch panel is not just about the panel itself—it includes managing the cable runs that feed into the back of the panel and the patch cords that connect the front ports to network equipment. Poor cable management is one of the most common problems in installed networks and one of the easiest to prevent with the right tools on hand.
Velcro Cable Ties and Hook-and-Loop Straps
Velcro hook-and-loop cable ties are the preferred fastener for bundling cable runs in any installation that adheres to TIA-569 or ISO/IEC 14763 cable management standards. Plastic zip ties, when over-tightened, deform the cable jacket and compress the pairs inside, increasing crosstalk and potentially causing channel certification failures. Velcro ties apply no compressive force and can be repositioned as many times as needed. Panduit and HellermannTyton both manufacture hook-and-loop tie products specifically rated for structured cabling use. A bag of 100 velcro cable ties costs $10–$20 and handles the management needs of a typical 24-port panel installation.
Horizontal Cable Managers
A 1U horizontal cable manager mounted directly above or below each patch panel keeps front patch cords organized and prevents them from sagging onto adjacent equipment. Without cable managers, a 48-port panel with 48 patch cords creates a mass of cables that blocks airflow, makes port identification difficult, and tangles whenever a single cord needs to be moved. Cable managers with finger ducts (plastic fingers that route cords side to side) are the most effective format and are available from Panduit, Leviton, and generic rack accessory manufacturers for $15–$60 per 1U unit.
J-Hooks and Cable Support Hardware
Behind the patch panel, the incoming cable runs need support at regular intervals to prevent the weight of the cable bundle from pulling on the terminations. J-hooks—plastic or metal saddle-shaped supports that attach to rack rails, cable tray structures, or wall studs—hold cable bundles without compressing them. TIA-569 recommends support points every 4–5 feet (1.2–1.5 meters) along horizontal cable runs. J-hooks are inexpensive ($0.50–$2.00 each) but must be installed before the cables are run, making them a planning item as much as a tool.
Fish Tape, Cable Pulling Tools, and Access Equipment
Unless the cable runs are already pre-pulled to the patch panel location, you will need tools to route cables through walls, above ceilings, and through conduit. The specific tools depend on the installation environment, but the following are consistently necessary.
Fish Tape
A fish tape is a long, semi-rigid steel or fiberglass tape that can be pushed through conduit or wall cavities to create a pull path. Once the fish tape reaches the destination point, the cable is attached to the tape and pulled back through. Steel fish tapes in 50-foot and 100-foot lengths handle most commercial installation scenarios. Fiberglass fish tapes are preferred in environments with live electrical wiring nearby because fiberglass is non-conductive. Klein Tools, Greenlee, and Milwaukee all manufacture reliable fish tape products.
Glow Rods and Flex Bits
Glow rods are fiberglass push rods used to navigate cable through open ceiling plenum spaces where a fish tape would be too stiff to maneuver around obstructions. They connect end-to-end in sections typically 4 feet long, allowing runs of 20–30 feet or more through tight above-ceiling spaces. Flex bits—long, flexible drill bit extensions—are used to drill through fire stops, top plates, and wall cavities in locations where standard drill bits cannot reach.
Step Ladder and Safety Equipment
Most network patch panel installations involve working at height—above ceiling tiles, on top of ladder racks, or reaching into the top of tall equipment racks. A 6-foot fiberglass step ladder is a standard piece of installation equipment. In data centers with raised floors or tall open-frame racks, a stable platform step stool is equally important. Personal protective equipment including safety glasses (for drilling and punching down conductors that can snap and become projectiles) and cut-resistant gloves (for handling cable edges and rack rails) should be worn throughout the installation.
Complete Tool List by Installation Phase
The table below organizes the required tools by phase of a typical network patch panel installation, from cable pulling through final documentation. Use this as a pre-job checklist to ensure nothing is missing before work begins.
| Installation Phase | Required Tools | Approximate Cost |
|---|---|---|
| Cable Pulling | Fish tape, glow rods, flex bit drill extensions, pull string | $40–$200 |
| Panel Mounting | Screwdriver set, cage nut tool, torque screwdriver, rack screws | $20–$80 |
| Cable Preparation | Cable stripper, flush cutters, scissors | $15–$50 |
| Termination | Impact punch-down tool, 110 blade, high/low force selector | $30–$120 |
| Cable Management | Velcro ties, J-hooks, horizontal cable managers | $25–$100 |
| Cable Tracing | Tone generator and inductive probe | $50–$150 |
| Testing | Wire map tester or certification-grade field tester | $30–$9,000+ |
| Documentation | Label maker, cable schedule template, certification tester export | $50–$200 |
Tools Specific to Shielded and Cat6A Patch Panel Installations
Shielded twisted pair (STP) cabling and Cat6A installations have specific tool requirements beyond the standard set. Ignoring these differences leads to grounding failures, shield continuity breaks, and certification test failures that are expensive to diagnose and fix after the fact.
Shielded Cable Prep Tools
STP cable has a foil or braided shield that wraps around all four pairs. After stripping the jacket, this shield must be carefully folded back over the cable jacket without tearing it, then bonded to the shielded patch panel's metallic connector housing during termination. A pair of fine-tipped needle-nose pliers and a dedicated shielded keystone jack termination tool (supplied by the panel manufacturer) are needed for this step. Attempting to fold and bond the shield with bare hands produces inconsistent shield contact, which defeats the purpose of shielded cabling.
Grounding Tools and Hardware
A shielded network patch panel must be bonded to the rack's grounding bus, which in turn connects to the building's telecommunications grounding and bonding system (as defined in TIA-607-C). This requires a grounding conductor (minimum 6 AWG copper for rack-to-ground bonding in most commercial installations), a lug crimping tool, and the appropriate compression lugs. A multimeter is used to verify continuity of the ground path from the panel to the main grounding electrode. If the ground path is open or exceeds 1 ohm of resistance, the shielding system will not function as designed.
Cat6A-Specific Considerations
Cat6A cable is significantly larger in diameter than Cat6—typically 7–8mm vs. 5–6mm—and requires larger cable management accessories (wider J-hook saddles, higher-capacity cable managers) and a punch-down tool set to high force for the stiffer 23 AWG conductors. The increased diameter also means that a 48-port Cat6A wired panel will have a much thicker cable bundle behind it than an equivalent Cat6 panel. Rear cable management space must be planned accordingly, with at least 3–4 inches of clear depth behind the panel for bundle management.
Safety Tools and Personal Protective Equipment
Patch panel installation is a physical trade job with real injury risks. The following PPE and safety tools should be part of every installer's kit.
- Safety glasses: Required when drilling, punching down conductors, and cutting cable. Wire ends and jacket fragments can become high-velocity projectiles.
- Cut-resistant gloves (Level A4 or higher): Rack rails and punch-out edges have sharp burrs. Cut-resistant gloves rated to ANSI/ISEA 105 Level A4 provide adequate protection without significantly impairing dexterity for cable handling.
- N95 respirator: Required when working in ceiling plenums with fiberglass insulation, spray fireproofing, or accumulations of dust and particulates.
- Knee pads: Terminating cables at floor-level patch panels in wall-mount enclosures requires sustained kneeling. Professional-grade knee pads reduce fatigue and prevent injury on concrete or tile floors.
- Headlamp or task light: The rear of a rack is dark. A headlamp leaves both hands free for cable work and eliminates the need for a helper to hold a flashlight.
- Non-conductive step ladder: Fiberglass ladders are mandatory when working near energized electrical equipment. Aluminum ladders present an electrocution risk in server rooms where power distribution units (PDUs) and UPS systems are installed.
Starter Kit vs. Professional Kit: What to Budget
For someone installing a small home or small office network patch panel for the first time, a minimal tool kit covers the essentials without unnecessary expense. For a professional installer deploying patch panels regularly across commercial projects, a complete kit delivers the quality and speed that professional work demands.
| Tool | Starter Kit Option | Professional Kit Option |
|---|---|---|
| Punch-Down Tool | Klein VDV427-300 (~$35) | Fluke Networks D914S (~$95) |
| Cable Stripper | Klein VDV110-095 (~$18) | Jonard Tools UST-100 (~$22) |
| Cable Tester | Klein VDV501-851 (~$60) | Fluke DSX-8000 (~$9,000+) |
| Tone Generator | Klein VDV500-820 (~$55) | Fluke Networks Pro3000 (~$100) |
| Label Maker | Dymo LabelManager 160 (~$30) | Brady BMP21-PLUS (~$90) |
| Total Approximate Cost | $200–$250 | $9,500+ (with tester rental: $400–$600) |
For professional contractors who cannot justify purchasing a certification tester outright, renting from Fluke Networks directly or through authorized rental partners typically costs $150–$300 per week, making certification economically accessible even for single-project use.


Are you ready to
cooperate with PUXIN?
cooperate with PUXIN?
Contact us to find out how our products can transform your business and
take it to the next level.
Ningbo Puxin Electronic Technology Co., Ltd. is a professional supplier of electrical engineering and integrated wiring product research and development and manufacturing.
Quick Links
Products
Keep In Touch
-

No.43 of Xiaotuanpu Road, Guanhaiwei Town, Cixi Ningbo City, Zhejiang, China
-

-

8615924366333
-

Mobile web